Lately I have become completely smitten with Reichenbach Multicolor glass and have been making all sorts of pretty Multi beads. Some of them were lucky enough to get to fly all of the way across the Atlantic Ocean to become this gorgeous bracelet by Shawnda D'Arcy of Jewelry By Shawnda.
If you like what you see here then you can find Shawnda and her beautiful creations on Etsy
https://www.etsy.com/shop/jewelrybyshawnda
Have a lovely evening, Jolene xx
13/03/2014
Gorgeousness from Michelle Ross
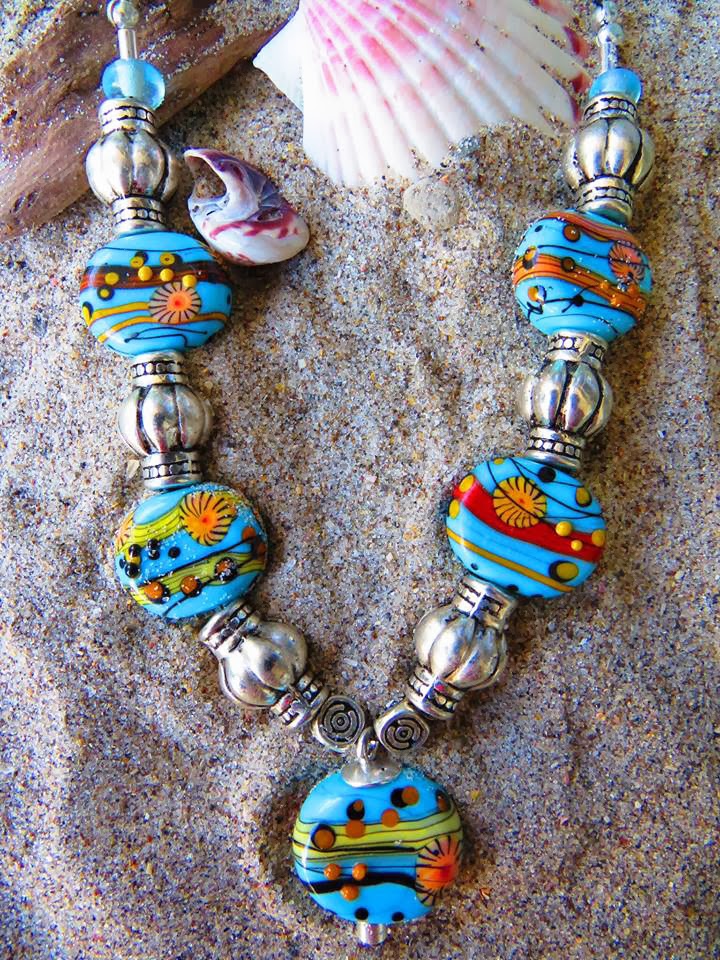
Look at this stunning necklace! I love seeing my beads all dressed up and ready to party and Michelle of Flying Pineapple Designs has done these pretties proud. They have travelled a long way to make it to the beach, all the way to New Zealand no less! I wish I was at the beach right now.
Mich also has a created a fabulously summery Lucky Lobster collection too. I especially love the wishbone type settings some of them are on, they look so elegant.
I hope you are having a super day in the sunshine where ever you are
Jolene x
Mich also has a created a fabulously summery Lucky Lobster collection too. I especially love the wishbone type settings some of them are on, they look so elegant.
I hope you are having a super day in the sunshine where ever you are
Jolene x
11/03/2014
Stunning silver ring by Faith Bowman
I had a lovely surprise yesterday, the very talented silversmith and jewellery designer Faith Bowman of abygem showed me this ring.
It features one of the little cabochons that I made for especially for her just before Christmas and hasn't she made it look wonderful!
Have a lovely day, Jolene xx
It features one of the little cabochons that I made for especially for her just before Christmas and hasn't she made it look wonderful!
Have a lovely day, Jolene xx
Labels:
abygem,
cabochon,
Customer Gallery,
Faith Bowman,
lampwork cabochon,
silver ring
10/03/2014
Messy testing - Firecracker
Over the last few days I have been looking at Firecracker ltd run. It is a rich and vibrant transparent red that tends towards orange a little in dilute form. I'm finding it easy to strike and great for making petal canes for summer floral beads.
For this set I made a petal cane with a core of CiM Peace and a thin encasing layer of Firecracker. The colours are fairly bright but a little more muted than I had hoped for.
The Firecracker cane I have used in this set uses a much thicker encasement of the rich red over Peace. The colour just sings out Summer to me! The orange flowers in this set are made with canes that combine CiM Pumpkin ltd run with Alley Cat ltd run.
The last Firecracker bead I have to show is this pretty ladybug. Her body is made with a large dot of Firecracker straight from the rod.
The fact that she is transparent rather than made with a bright opaque red makes her look like she kind of glows on this bead. It's a super effect.
The sun is shining and the glass is calling! Have a great week, Jolene x
My Etsy and My eBay
For this set I made a petal cane with a core of CiM Peace and a thin encasing layer of Firecracker. The colours are fairly bright but a little more muted than I had hoped for.
The Firecracker cane I have used in this set uses a much thicker encasement of the rich red over Peace. The colour just sings out Summer to me! The orange flowers in this set are made with canes that combine CiM Pumpkin ltd run with Alley Cat ltd run.
The last Firecracker bead I have to show is this pretty ladybug. Her body is made with a large dot of Firecracker straight from the rod.
The fact that she is transparent rather than made with a bright opaque red makes her look like she kind of glows on this bead. It's a super effect.
The sun is shining and the glass is calling! Have a great week, Jolene x
My Etsy and My eBay
Labels:
Firecracker ltd run,
Messy testing
05/03/2014
Mini Mo' Club Jan 2014 - Robin Egg and Peacock Feather
My first collection for January was called Robin Egg and uses only two colours, Effetre Ivory and Effetre Teal Green. All for the lovely detail in the murrini and canes has been created using fine silver leaf.
The first bead I have to show you uses the Robin Egg ribbon twistie within it's core. I have created a silvered ivory raked fern and added a Silvered Feather murrini, left slightly raised for surface detail.
My second bead here also features Silvered Feather murrini, this time melted in completely smooth.
My second collection is called Peacock feather and uses Effetre Petrol Green, Lime Green and Dark Sky Blue with Vetrofond Periwinkle.
The first bead I have to show here is a variation on the twistie cored focal with hearts tutorial that I published on my blog yesterday.
Next up is a delicious teal focal featuring some Peacock feather murrini over delicious teal and green glass.
Last up is this sweet free-form floral. All of the striped petal detail was swiped on using the delicate Vetro Periwinkle canes from this collection.
It is possible to join the Mini Mo' Club via Etsy for 3, 6, 9 or 12 month long subscriptions. Please check out my shop link for more info.
Frit N Chips lampwork supplies.
Have a lovely week, Jolene x
The first bead I have to show you uses the Robin Egg ribbon twistie within it's core. I have created a silvered ivory raked fern and added a Silvered Feather murrini, left slightly raised for surface detail.
My second bead here also features Silvered Feather murrini, this time melted in completely smooth.
My second collection is called Peacock feather and uses Effetre Petrol Green, Lime Green and Dark Sky Blue with Vetrofond Periwinkle.
The first bead I have to show here is a variation on the twistie cored focal with hearts tutorial that I published on my blog yesterday.
Next up is a delicious teal focal featuring some Peacock feather murrini over delicious teal and green glass.
Last up is this sweet free-form floral. All of the striped petal detail was swiped on using the delicate Vetro Periwinkle canes from this collection.
It is possible to join the Mini Mo' Club via Etsy for 3, 6, 9 or 12 month long subscriptions. Please check out my shop link for more info.
Frit N Chips lampwork supplies.
Have a lovely week, Jolene x
Labels:
mini mo colour club
04/03/2014
Twistie cored focal bead with hearts
I tend to make these beads on 4mm mandrels, turns out they are great as a center piece for beaded kumihimo type bracelets.
Equipment and glass that I've used:
Make a tube bead out of clear or pale transparent glass that fits the cavity on your 1 size down from the size you would like to make.
Step 2
Encase your clear core with a layer of CiM Maracshino.
Step 3
Melt the Maraschino glass in and round off the edges in your graphite roller.
Step 4
Wrap a spiral of twistie cane around your Maraschino Core. I've used a black edged goldstone ribbon twistie here but you can use whatever twistie cane you like to make best.
Step 5
Wrap a second spiral of twistie cane around your core bead laying it between the wraps of the first spiral.
Step 6
Melt in your twistie wraps carefully and marver them in smooth with a graphite paddle.
Step 7
Spot heat your bead and make some twists with a fine black stringer to add interest.
Step 8
Encase your bead with a layer of clear glass. I have used Effetre 006 clear here.
Step 9
Melt in your encasing layer and smooth off your bead in the roller cavity.
Step 10
Add more clear glass at the edges and around the centre of your bead. By doing this you are ensuring that you will make neat puckered bead holes and are bulking out your bead to fill the next size up cavity in your roller.
Step 11
Melt in your clear glass and shape your bead in your roller.
Step 12
Add 4 or 5 largish white dots close to the bead holes on both sides of your bead and melt them in flat
Step 13
Add large dots of CiM Maraschino over your white dots and melt them in flat.
Step14
Spot heat each dot in turn and rake your dots into hearts using a dental pick.
Step 15
Repeat the heating and raking process on the other side of your bead.
Step 16
Slowly melt your bead smooth again and shape in your roller cavity.
Step 17
Pull some extra fine white stringer, I heat the end of the commercial stringer and anchor it to the end of my mandrel to pull out fine stringer as I need it.
Step 18
Wrap the fine stringer randomly around the centre of your bead and melt it smooth.
Step 19
Heat your bead until glowing and then press it in a parallel press or handheld mashers.
Step 20
Flame polish away any chill marks created when you pressed your bead and pop it in your kiln to anneal.
Have a great day, Jolene x
My Etsy and My eBay
and Frit N Chips lampwork supplies.
Equipment and glass that I've used:
- round cavity graphite bead roller
- graphite paddle
- steel dental pick
- parallel mashers
- clear glass
- CiM Marachino
- Effetre white commercial stringer
- goldstone ribbon twistie cane
- fine black stringer
Make a tube bead out of clear or pale transparent glass that fits the cavity on your 1 size down from the size you would like to make.
Step 2
Encase your clear core with a layer of CiM Maracshino.
Step 3
Melt the Maraschino glass in and round off the edges in your graphite roller.
Step 4
Wrap a spiral of twistie cane around your Maraschino Core. I've used a black edged goldstone ribbon twistie here but you can use whatever twistie cane you like to make best.
Step 5
Wrap a second spiral of twistie cane around your core bead laying it between the wraps of the first spiral.
Step 6
Melt in your twistie wraps carefully and marver them in smooth with a graphite paddle.
Step 7
Spot heat your bead and make some twists with a fine black stringer to add interest.
Step 8
Encase your bead with a layer of clear glass. I have used Effetre 006 clear here.
Step 9
Melt in your encasing layer and smooth off your bead in the roller cavity.
Step 10
Add more clear glass at the edges and around the centre of your bead. By doing this you are ensuring that you will make neat puckered bead holes and are bulking out your bead to fill the next size up cavity in your roller.
Step 11
Melt in your clear glass and shape your bead in your roller.
Step 12
Add 4 or 5 largish white dots close to the bead holes on both sides of your bead and melt them in flat
Step 13
Add large dots of CiM Maraschino over your white dots and melt them in flat.
Step14
Spot heat each dot in turn and rake your dots into hearts using a dental pick.
Step 15
Repeat the heating and raking process on the other side of your bead.
Step 16
Slowly melt your bead smooth again and shape in your roller cavity.
Step 17
Pull some extra fine white stringer, I heat the end of the commercial stringer and anchor it to the end of my mandrel to pull out fine stringer as I need it.
Step 18
Wrap the fine stringer randomly around the centre of your bead and melt it smooth.
Step 19
Heat your bead until glowing and then press it in a parallel press or handheld mashers.
Step 20
Flame polish away any chill marks created when you pressed your bead and pop it in your kiln to anneal.
Have a great day, Jolene x
My Etsy and My eBay
and Frit N Chips lampwork supplies.
Labels:
cane,
encasing,
focal,
free lampworking tutorial,
heart,
lampwork,
lampwork tutorial,
stringer,
twistie
03/03/2014
Mini Mo' Club Dec 2013 - Lucky and Ray, Lucky and Tetra
I'm having a little catch up on my Mini Mo' blogging, it's been a while. Looking back to December, my first collection has Lucky Lobster and Stingray murrini. I've used Effetre Lime Green, Effetre Coral, CiM Khaki and CiM Adamantium.
The first piece I want to show is this chunky cabochon which features both Ray, Lucky and Tetra murrini over Effetre Pea Green, pixie dust and under 006 clear.
This fab Chrissie Crab focal has been created with the Adamantium canes in my Lucky and Ray collection.
Last up in this lush lime encased mini set. The core is light aqua covered with a twist of green ribbon cane and then encased in 006 clear.
My second collection from December features Lucky Lobster and Tetra Fish murrini. I have used Effetre Lime Green, Reichenbach Black, Vetrofond Periwinkle and Effetre Light Teal 026.
First up is this organic trio using the periwinkle cane over CiM Chalcedony glass.
Another Chrissie crab focal, this time using pea green cane from the Lucky and Ray collection.
My last bead for this post is a large teardrop shaped pressed tab created with the same pea green cane and all sorts of fun dot layering and raking techniques.
It is possible to join the Mini Mo' Club via Etsy for 3, 6, 9 or 12 month long subscriptions. Please check out my shop link for more info.
Frit N Chips lampwork supplies.
Have a lovely week, Jolene x
The first piece I want to show is this chunky cabochon which features both Ray, Lucky and Tetra murrini over Effetre Pea Green, pixie dust and under 006 clear.
This fab Chrissie Crab focal has been created with the Adamantium canes in my Lucky and Ray collection.
Last up in this lush lime encased mini set. The core is light aqua covered with a twist of green ribbon cane and then encased in 006 clear.
My second collection from December features Lucky Lobster and Tetra Fish murrini. I have used Effetre Lime Green, Reichenbach Black, Vetrofond Periwinkle and Effetre Light Teal 026.
First up is this organic trio using the periwinkle cane over CiM Chalcedony glass.
Another Chrissie crab focal, this time using pea green cane from the Lucky and Ray collection.
My last bead for this post is a large teardrop shaped pressed tab created with the same pea green cane and all sorts of fun dot layering and raking techniques.
It is possible to join the Mini Mo' Club via Etsy for 3, 6, 9 or 12 month long subscriptions. Please check out my shop link for more info.
Frit N Chips lampwork supplies.
Have a lovely week, Jolene x
25/02/2014
My latest Beads of Courage Beads
Following on from the 52 little things project last year where I made a special bead each week for Beads of Courage, this year I am going to be having a studio afternoon each month instead
My first offerings are these sweet Fun Guys with googly eyes and chubby cheeks!
I got a chance to nip into the studio for February's BoC play afternoon yesterday and made these very cute Monkey Shines! beads. The tutorial for these is by Sharon Peters and can be found in the Hot Glass for Cool Kids e-book written by Diane Woodall last year.
They were so so so much fun to make!
If you make lampwork beads and have some that you'd like to donate to Beads of Courage then the addresses need to know are:
UK
Be Child Cancer Aware
Beads of Courage
2, Park Close
Wickford
Essex
SS12 9EH
USA, Japan, New Zealand:
Beads of Courage
3230 N. Dodge Blvd.,
Suite J Tucson,
AZ 85719
United States
Canada: Beads of Courage
Attn: Bead Donations
3119 35th Ave SW
Calgary,
Alberta
T3E 0Z8
Canada
Have a great day, Jolene xx
My first offerings are these sweet Fun Guys with googly eyes and chubby cheeks!
I got a chance to nip into the studio for February's BoC play afternoon yesterday and made these very cute Monkey Shines! beads. The tutorial for these is by Sharon Peters and can be found in the Hot Glass for Cool Kids e-book written by Diane Woodall last year.
They were so so so much fun to make!
If you make lampwork beads and have some that you'd like to donate to Beads of Courage then the addresses need to know are:
UK
Be Child Cancer Aware
Beads of Courage
2, Park Close
Wickford
Essex
SS12 9EH
USA, Japan, New Zealand:
Beads of Courage
3230 N. Dodge Blvd.,
Suite J Tucson,
AZ 85719
United States
Canada: Beads of Courage
Attn: Bead Donations
3119 35th Ave SW
Calgary,
Alberta
T3E 0Z8
Canada
Have a great day, Jolene xx
Labels:
BCCA,
be child cancer aware,
Beads of Courage,
BoC
Messy testing - Gypsy and Marine ltd run colours
I've fallen for Gypsy in a big way, it's a deep and rich super saturated purple transparent. In the tabs here I have teamed it up with Marine over Effetre light blue 224. I added most of the detail on these beads with encased stringer made with either Gypsy or Marine over a core of 224. On a few of these bead where I have added swipes of glass straight from the rod of Gypsy the colours is so deep and intense that it looks like neat Vimto!
Marine did not take too well to being flame polished after being chilled in the brass press that I used to make the flat tab shapes. Until that point it was fuss free and didn't pit or bubble in the slightest like many transparent blues and aqua glass can. I think I pushed it just that little bit too far and worked just a little too hot! Gypsy and Marine both etch well.
Marine really comes into it's own when used to make tiny tiny dots. I've layered it up with Effetre white here and it looks delicious. Gypsy is pretty used this way too and bith look lush over Effetre baby pink.
Have a great weekend, Jolene x
My Etsy and My eBay
Marine did not take too well to being flame polished after being chilled in the brass press that I used to make the flat tab shapes. Until that point it was fuss free and didn't pit or bubble in the slightest like many transparent blues and aqua glass can. I think I pushed it just that little bit too far and worked just a little too hot! Gypsy and Marine both etch well.
Marine really comes into it's own when used to make tiny tiny dots. I've layered it up with Effetre white here and it looks delicious. Gypsy is pretty used this way too and bith look lush over Effetre baby pink.
Have a great weekend, Jolene x
My Etsy and My eBay
Labels:
CiM,
Gypsy ltd run,
Marine ltd run,
Messy testing
24/02/2014
Messy testing - Rudolf and Orange Crush part 2
I had a couple of questions come up on CP about how Orange Crush compares to Clockwork and Rudolf compares to Maraschino so thought I would take some side by side photos to show.
Clockwork on the left stays transparent while the Orange Crush opacifies quite a bit when struck. These beads are really tiny so they were not worked for very long in the flame. Both are really lovely juicy colours but Orange Crush wins the beauty contest for me.
Maraschino Vs Rudolf - Both of these scrumptious reds become more opaque when struck, Maraschino (on the left) more so than Rudolf. Marashino looks pinkish and Rudolf appears to tend towards orange. This picture was taken outside in very bright sunlight.
I also really wanted to make some encased florals with Orange Crush. I have used a very thin stringer of Orange Crush and placed the dots over Effetre white. The core colour is Effetre light olive. The flower and fern patterns have all struck easily and evenly under layer of 006 Clear. Orange Crush looks really bright and pretty even when used in tiny amounts.
Have a great weekend, Jolene x
My Etsy and My eBay
Clockwork on the left stays transparent while the Orange Crush opacifies quite a bit when struck. These beads are really tiny so they were not worked for very long in the flame. Both are really lovely juicy colours but Orange Crush wins the beauty contest for me.
Maraschino Vs Rudolf - Both of these scrumptious reds become more opaque when struck, Maraschino (on the left) more so than Rudolf. Marashino looks pinkish and Rudolf appears to tend towards orange. This picture was taken outside in very bright sunlight.
I also really wanted to make some encased florals with Orange Crush. I have used a very thin stringer of Orange Crush and placed the dots over Effetre white. The core colour is Effetre light olive. The flower and fern patterns have all struck easily and evenly under layer of 006 Clear. Orange Crush looks really bright and pretty even when used in tiny amounts.
Have a great weekend, Jolene x
My Etsy and My eBay
Subscribe to:
Posts (Atom)


