Etsy

Showing posts with label la patisserie press. Show all posts

30/09/2012

Luscious Caramels made with CiM Ghee

Every now and then I get a terrible crush on a glass colour and right now I am sweet on CiM Ghee.

I've had a little bit of this glass in my stash for a very long time but have rarely done anything with it. In rod form Ghee looks like a pale yellow that falls somewhere just shy of fully opaque. Yellow, pale yellow in particular, has never been up there as one of my go to colours.

My recent fascination with making sweet treats and chocolate beads with my Kati press has had me looking at glass colours in a whole new way. I've been opening draws and musing what glass actually looks good enough to eat! Looking with sweet shop eyes at Ghee made me wonder if it might work well for lemon icing or lemon curd filling for sponge cakes. When I took my first Ghee test bead out of the kiln I was thrilled with how utterly delicious it looked. Without any fuss or special treatment from me it had struck evenly to a rich caramel, looking melt in the mouth delicious and utterly lickable (though I can promise you that I haven't actually licked any!                   

To the right are a trio of Ghee based apple caramel beads iced with milk choc, dark choc and white icing and Ghee looks suitably delicious in combination with all three or them and has me hankering to make glass profiteroles too! Nom nom nom!

Frit N Chips lampwork supplies Kitzbitz Art Beads Buzzword Bracelet Beads

21/09/2012

La Patisserie Press III - flowers and diamonds

Today I am going to show you two more step by step tutorials for my beloved Kati was here! Patissierie Press.  This post is for the two most complicated chocolate shapes, the first is for the flower cavity and the second is for the diamond shape that I can't help but think of as "vanilla fudge".
This is what the flower cavity looks like, symmetrical across the mandrel line but asymmetric hole to hole. For a little while this shape has presented me with a little bit of a challenge but now I finally have a consistant working process that I'm happy to share.
Step 1 add a row of small wraps of glass to your mandrel and roll it out on your marver at an angle until you have a cone shape long enough to fill the full length of the flower cavity.
Step 2 press your cone into the flower cavity (I like to use the handle side only at this point so that I can work at eye level) to leave indents where the internal points of the flower meet your core bead.
Step 3 add four small dots of glass between the indents to start building your petal shapes
Step 3 warm your beads and press inside the flower cavity on the handle side of your press. turn the bead over and press the other side.
Step 5 Start to give your flower form some depth by putting five small dots on top of your petals, turn the bead over and place five more dots on the petals on the other side.
Step 6 warm your bead thoroughly and press in the flower cavity on your handle, turn the bead and press again. Repeat steps 3 through to 6 as many times as you need to, adding small amounts of glass each time until you are happy with your flower form.
Step 7 add small dots of glass to the centre of your flower shape on both sides.
Step 7 warm your bead thoroughly and press in the flower cavity in the handle, turn the bead and press the other side.
Step 8 add a generous dollop of glass top and bottom of your flower bead.
Step 9 heat your bead through and place your bead in the base and press between both halves of the press. This will smooth the shape and push glass down onto the texture plate to give you the waves on the bottom.
Next decorate your choc with murrini, stringers, textures and other fun stuff to make it look extra yummy!

If you take more care in the initial length of your footprint than I have here (mine was about 1/2mm too long) there will not be any overspill on to your mandrel through the pressing process. This bead will need to be cold worked with a diamond coated bit once properly annealed to remove the tiny amount of excess glass between its bottom petals.
I have also been having quite a bit of fun with this shape by treating it like a murrini making mold - the smiley face on my Pumpkin Murrini was form by half filling the flower cavity with black glass. This gorgeous orange colour is CiM Creamsicle which is one of my all time favourite glass colours.
Next I'd like to show you the vanilla fudge (diamond) form. I have found this shape the most difficult to get to grips with despite the fact that at first glance it looks to be quite a simple form without curves or ridges to consider. I have found that it is a rather round about and counter intuitive route that I have needed to take to get consistently crisp looking lines and smooth and uniform bead holes.

Step 1 add a row of small wraps of glass to your mandrel and roll it out on your marver until you have a tube shape long enough to fill the full length of the diamond cavity. In cross section it will look like a rectangle with corners that stick out beyond the cavity shape.
Step 2 super heat the tube until the whole core is liquid and shrinks back in to a rugby ball form. Keep the bead turning to keep the glass centred and even.
Step 3 Allow the bead to cool slightly and then press in to the diamond cavity in handle part of the press. Turn the bead over and press the other side.
Step 4 add two dots top and bottom of the bead fairly near where the bead footprint tapers off on the mandrel.
Step 5 heat the dots on and press the bead again in the diamond cavity in the handle, turn the bead and press again on the other side.
Step 5 repeat step 4 add two dots top and bottom of the bead fairly near where the bead footprint tapers off on the mandrel. The idea is that I am adding glass specifically corners little by little and building up the form gradually.
Step 7 repeat step 5 heat the dots on and press the bead again in the diamond cavity in the handle, turn the bead and press again on the other side.
Keep going with adding tiny dots at the corners and pressing in the diamond cavity until you have neat filled in corners and smooth well formed bead holes that are no longer tapered or sharp.
Step 8 add a generous dollop of glass top and bottom of your flower bead.
Step 9 heat your bead through and place it in the base and press between both halves of the press. This will smooth the shape and push glass down onto the texture plate to give you the waves on the bottom.

This delicious looking toasted caramel/toffee/boiled sugar sweet treat looking glass is CiM Ghee and I will be doing a whole blog post dedicated to this glass and how well it lends itself to confectionery beads in the near future.

I hope that my trio of short tutorials with the Kati was here! La Patisserie Press have helped to inspire. You can view the full list of tutorials that I have published on my blog here.

Have fun! Jolene x

Frit N Chips lampwork supplies and Kitzbitz Art Beads

10/09/2012

La Patisserie Press II - Creme Caramels

Today I'd like to show you how I have been making little iced oval chocolates with icing and Caramel drizzle with my new La Patisserie Press (which I love!)
Step 1 add a row of small wraps of glass to your mandrel and roll it out on your marver until you have a tube shape long enough to fill the full length of the oval cavity. In cross section it will look like a rectangle with corners that stick out beyond the oval shape.

Press your tube, turn, press again, turn, press again until the corners of your tube have been rounded off.
Step 2 add more wraps of glass to just the centre section of your bead
Step 3 press gently in to the top part of the press (the part with the handle) then flip it over and press again, add small dabs of glass where needed and press again until the shape is filled
Step 4 take a contrasting 2 or 3 mm stringer and draw and outline around the edge of the top side of your bead.


Step 5 fill in your outline with swipes of the same stringer
Step 6 heat your bead through and place your bead in the base and press between both halves of the press. This will smooth the shape and push glass down onto the texture plate to give you the waves on the bottom
Step 7 flame polish the top surface of your bead ready for decoration
Step 8 the stringer I am using for the caramel sauce is an encased stringer of CiM Peace encased with Effetre medium Topaz transparent 016. It is a good idea to prepare several stringers in advance. Apply your stringer in one continuous smooth trail back and forth across your bead
Step 9 heat the surface of your bead until just soft and rake about 1/3 of the way down your bead with a fine clear stringer (or fine stringer that matches your icing) to drag you caramel sauce
Step 10 heat the surface of your bead again until the surface is just soft and rake a line 2/3 of the way down in the opposite direction to finish the look. Warm your bead through thoroughly and place in your kiln to anneal.

Variations on a theme - why not ice white choc beads with dark chocolate and strawberry sauce or go minty instead? Try raking lines across the width of your bead rather than lengthways for a totally different look.

Have fun! Jolene x

Frit N Chips lampwork supplies and Kitzbitz Art Beads

09/09/2012

Visual taste test - White Chocolate!

I am completely smitten with my new press, La Patisserie by Kati was here! so yesterday I grabbed a rod each of all of the likely suspects and made some White Chocolate beads..........

My preconception when selecting rods was that my favourite white chocolate colour would be D followed by C then F. It turned out that F was my hands down favourite but I had this niggling feeling that although it looked pretty it was nowhere near the most realistic shade of the 6.
I decided to get some other opinions so I put this image up on Craft Pimp Forum  and on my Facebook Page this morning and asked the girls and boys over there for feedback on most yummy looking/most like white chocolate. I collated the results after 12 hours of canvasing for opinions and scored the feedback.

If someone chose a single clear favourite then I awarded that bead 3 points. If more than one bead was selected then I awarded points on a sliding scale as follows -
Prefers X then Y, X gets 2 points, Y gets 1 point.
Likes X and Y (and Z...), 1 points each.
Thinks X or Y (or Z) is good then 1 points each.

The Glass!
  • A Reichenbach 104 Porcelain
  • B Vetrofond Dark Ivory 262
  • C Effetre Dark Ivory 276
  • D CiM Linen
  • E Vetrofond Honey Crunch 540
  • F Vetrofond Belgian Lace/Yellow Ice 947
The results are very interesting with a clear favourite with F, Vetrofond Belgian Lace with 58% of the vote, followed by C, Effetre Dark Ivory with 26%. The third place favourite was B, Vetrofond Dark Ivory with 11% and 4th was D, CiM Linen with the remaining 5%. 0 votes for Reichenbach Porcelain or Vetrofond Honey Crunch.
And here is the really really interesting bit, I put up the photo on the left on FB only at the same time as the one above because I had prepared it (even though I had already decided to ask for opinions on the underside pic as it showed more or the glass colour). It shows the same 6 beads but decorated side up this time. It attracted a completely different set of opinions and so I have done a tally for this image as well. The surprise favourite is D, CiM Linen with 52% of the vote followed by C,  Effetre Dark Ivory with 24%, B Vetrofond Dark Ivory with 19% and A Reichenbach Porcelain with the remaining 5%. F, Vetrofond Belgian Lace did not even get a mention.


What this little experiment tells me is that I have 3 excellent options to choose from when I want to make yummy looking white choc beads - Vetrofond Belgian Lace for plain and textured chocs, CiM Linen which is much darker in tone than Belgian Lace holds up well to being "Iced" and Effetre Dark Ivory as a good all rounder option.

Thank you to everyone who played along and shared their opinions today.

Jolene x

Frit N Chips lampwork supplies and Kitzbitz Art Beads

06/09/2012

La Patisserie Press mini tutorials part I

I have wanted a La Patisserie press by Kati was here! from the very first moment I saw it back in 2010. It was tool lust at first sight, I resisted temptation because I am rubbish with presses! Quite quite poor at judging the amount of glass needed and too impatient to try over and over to get the knack of it. Just recently I made some citrus slice murrini for the Mini Mo' Club and they have been whispering to me about how much they want to be decorating chocolate beads and so I gave in......and I'm really glad I did, it is really quite a forgiving press when it comes to glass quantities and I've never enjoyed a press so much before.

It arrived this morning and I have been playing about with the different shapes and trying to figure out the best way to add glass the make them work for me. Here is a quick how to guide of what I have come up with so far, Cookie Cutter, Square and Heart, part 2 to follow soon.

Cookie Cutter

This is what the cookie cutter cavity looks like, you can see the waves of the texture plate at the bottom of this press (the base is reversible, the bottom of your beads can be plain too if you like).
Step 1 Wrap your mandrel and roll out the glass on a graphite paddle to just short of the width of the cavity
Step 2 Wrap a second layer of glass over your barrel and then press gently in to the top part of the press (the part with the handle) then flip it over and press again, repeat until the press is filled except for the frills
Step 3 Put a large dot of your glass in top and bottom and heat well
Step 4 heat your bead through and place your bead in the base and press between both halves of the press. This will fill the frills and press glass down onto the texture plate
 Step 5 gently flame kiss out the chill marks from the non textured side of your choc bead
Step 6 I am going to decorate this choc bead with pixie dust (mica). The colour I am using is Bright Gold Sparkle.

First a few notes on working with mica, wear a dust mask when handling and using mica in the same way you would when working with enamels and frits. Never use a shaker to apply the mica to your beads as this will cause the fine particles to become air born and never dip a hot bead in to a plastic container. A little mica goes a long way so pick up just a very small amount on a tea spoon to apply it.
Warm up your bead until it is glowing but not molten and dip the hot surface of your bead on to a small amount of mica then flash the bead back and fourth in the top of flame to get the pixie dust to stick.
Step 7 Sparkle Pixie dust can take quite a bit of heat without being burnt off so it is possible to add further decoration on top of the mica. I have decorated this chocolate with twistie cane leaves and an encased stringer rose.


Square

This is what the square cavity looks like, in this pic you can also see the twistie cane that I used in the previous bead to make the leaves.
Step 1 Wrap your mandrel and roll out the glass on a graphite paddle to just short of the width of the cavity (I find it easier to do this against the handle part rather than the base part)
Step 2 Wrap a second layer of glass over your barrel
Step 3 Press gently in to the top part of the press (the part with the handle) then flip your bead over and press again to flatten out
Step 4 add generous dots to the four corners of your bead to pad out the empty spaces in the cavity
Step 5 heat the dots in and press in the square cavity again, flip the bead over and press again
Step 6 add four small dots on the corners on both sides and melt in thoroughly to bulk out the top and bottom
Step 7 place your bead in the base and press between both halves of the press. This will fill the corners properly and press glass down onto the texture plate
Step 8 gently flame kiss out the chill marks from the non textured side of your choc bead
Step 9 decorate your bead, this one has twistie cane leaves and Gorgeous Grapefruit murrini
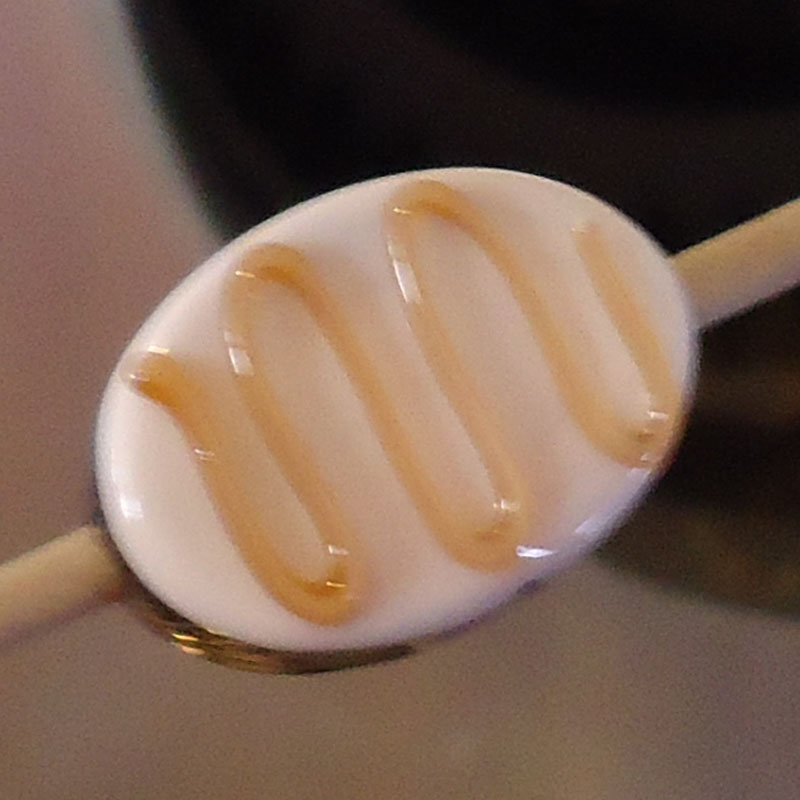


Heart

This is what the heart cavity looks like with the wave texture plate underneath
Step 1 Wrap your mandrel and roll out the glass on a graphite paddle to just short of the width of the cavity
Step 2 wrap more glass on one side of the barrel only. Next gently press into the top part of the press (the part with the handle) then flip your bead over and press again to flatten out the other side too
Step 3 place generous dots of glass on your bead where the "lobes" will be
Step 4 melt in well then press each gently in the heart cavity in the handle
Step 5 place small dots of glass to bulk out the lobes further
Step 6 melt in well then press each side gently in the heart cavity in the handle part of the press
Step 7 swipe on extra glass top and bottom in a V shape to bulk out the depth of your bead
Step 8 place your bead in the base cavity and press between both halves of the press. This will fill the whole cavity fully and push glass down onto the texture plate to give you chocolate bead wavy lines on the bottom
Step 9 gently flame kiss out the chill marks from the non textured side of your choc bead ready to decorate
Step 10 I have decided to add texture to the top on this bead with another texture plate, this one is a grid from the Zoozie texture tool. Heat you bead til glowing but not molten and press on to the texture plate gently
I'm going to decorate the grid textured surface with fine silver leaf which is fairly commonly found in books as loose sheets
Step 11 pick up a small amount of silver leaf with tweezers and burnish on
Step 12 burn off excess silver to partially reveal the textured surface.

I hope you have enjoyed these mini tuts on how I have been using my new press today and the fun ideas for chocolate decorations!


Jolene x

Frit N Chips lampwork supplies and Kitzbitz Art Beads