Etsy

23/09/2015

Mandala beads and buttons

I'm so totally thrilled with this mornings kiln harvest. I've been wanting to try to make something like this for yonks but just didn't have enough skill and heat control to stop a large disc from just collapsing in on itself. These beads and buttons all turned out deliciously and I can't wait to get back into the studio to play with this style again.


Have a great day, Jolene xx
www.kitzbitz.com

15/08/2015

Messy testing - Dirty Laundry, Ladybug and Red Alert ltd run

Today I'm looking at a new shade of opal white coming out soon from CiM called Dirty Laundry ltd run. I have used Dirty Laundry as the base for the first trio of hearts in the picture on the left. Dirty laundry looks slightly creamy yellow in comparison with Marshmallow (middle set) and is much denser than Cirrus (trio on the right).
The heart below is also made over a base of Dirty Laundry.


The flower petals for all of these white hearts are made with  Emperor ltd run layered over Grumpy Bear stringer. For the Marshmallow set I have used Effetre yellow opalino also. All of the foliage is made with Ogre ltd run. The colour changing effects of Ogre are unpredictable but also adds a lot of interest.

I have also been looking at two new shades of opaque red, Red Alert ltd run and Ladybug ltd run. Red alert is the darker of the two and has beautiful striations. I pulled a fine stringer of Red Alert and used it to create these poppy petals. The colours variation mades them look shaded and gives them a lot of depth and interest. The hearts below were also made with Red Alert, you can see the colour variation much more clearly here.


The petals for the flowers on this second Glacier focal were made with new ladybug ltd run. It is a bright, vibrant and streak free strawberry red. Below are my test beads of Red Alert (top bead) and Ladybug (bottom bead) side by side.

Jolene x

13/08/2015

Chunky Cool fall discs tutorial in Beads & Beyond Magazine Sept 15

Hot off the press and fresh on the shelves, the September edition of Beads & Beyond magazine has a tutorial in print showing how to make these Pantone Fall 2015 colours inspired chunky disc beads.

Jolene xx

12/08/2015

Messy testing - Eucalyptus, Ogre and Leaf Men ltd run

This evening I am showing three new shades of ltd run green glass coming soon to the CiM Palette. First up is Eucalyptus ltd run, a delicious pale grey green opaque that looks slightly striated in these beads. The egg at the back has been decorated with layered dots of Effetre Opal Yellow and Gold rich Rubino Ora. The front bead has been decorated with Reichenbach Multi Color Dark. Neither bead show signs of fuming or reactions between Eucalyptus and the Rubino or Multi Dark.
This next pair of beads are made on a base of Ogre ltd run. At first glance these beads appear quite similar to the same designs over a Eucalyptus (see image above) but Ogre strikes to a variety of shades from greyish blue to green to brown and is also quite reactive as you can clearly see in the bead decorated with Reichenbach Multi Color Dark ferns. There is a delicate halo surrounding the outline of the fern details.


These are the same Ogre  beads from a different angle showing some of the colour variation possible with this fascinating glass.
The last green that I have been testing this week is called Leaf Men ltd run. It is a rich jungle green that gives beautiful deep green striations across the surface of the beads. Like Ogre, Leaf Men is also shows a delicate looking halo reaction with Multi Dark.

Jolene x

11/08/2015

Messy testing - Autumn, Moccasin and Indian Summer ltd run

This evening I am looking at three new brown glass colours coming out soon from CiM. The first is called Autumn ltd run, it is a rich nutty peach opaque. I found it a bit shocky to work with and so pre-warmed the rods in the kiln. Once warmed it melted like a dream. Autumn makes a lovely base for Reichenbach Multicolour dark (Far left) bringing out the purple colours beautifully. The egg in the middle is decorated with Reichenbach Deep black and the third egg has been decorated with stacked dots of Effetre Opal Yellow and Rubino Ora. Autumn does not show any signs of reacting with or being fumed by either the Multi Dark or Gold Rich Rubino glass.

This egg beads were made with Moccasin ltd run. I really like this colour, it is a warm pale milky chocolate brown that also makes a great base for Multi Dark (far right) and shows no signs of fuming with Gold rich Rubino (leftmost bead). The bead in the the middle is decorated with Reichenbach Deep black. Moccasin is very well behaved in the flame, not shocky at all, and it melts like a dream.

This delicious transparent is called Indian Summer. In rod form it looks quite a bit lighter, Maybe it strikes a little in the kiln as I didn't notice any signs of the glass darkening up (striking) in the flame and was surprised just how dark my test beads looked when they came out of the kiln the next day (see pic below). The egg shaped bead here looks like is has an almost ombre effect going on as the colour looks lighter where the glass thickness lessened towards the point. It has been decorated with raked Multi Dark dots.

From left to right, Effetre Light Topaz 012, Effetre Medium Topaz 014 and CiM Indian Summer ltd Run. I picked out these two Effetre shades to test against as Indian Summer in rod form looked to me to likely fit somewhere between the two. As you can see it came out of the kiln much darker and puts me in mind of the colour of cola after all of the ice has melted in my glass.


Jolene x

03/08/2015

Messy testing - Limelight, Tutu and Celeste ltd run

This post is all about three pretty pale transparents that are brand new shades out soon from CiM. These colours are so pale that I am actually comparing them side by side with some Bullseye tints (CoE 90).  First up, Limelight ltd run, which I found to be beautiful but a bit fussy and prone to boil. On this string from left to right there is Bullseye Grass Green 1807, Limelight ltd run and Limelight ltd run etched with Dip N Etch.

Tutu ltd run did not like my hot flame much either. I tend work very hot, two oxygen concentrators feeding a Carlisle Mini CC and am not very patient when it comes to colours that need to be worked higher in the flame and my Tutu Hearts turned out look almost like seeded glass. On this pink string from left to right are Tutu etched with Dip N Etch, Tutu ltd run and lastly Bullseye Erbium Pink 1821 which is the palest pink tint Bullseye glass that I had in the stash.

Celeste ltd run was far better behaved for me in terms of coping with the high heat. From left to right you can see Bullseye Juniper Blue 1807, Celeste, Celeste etched with Dip N Etch.
It is such a pretty shade, very similar to but a touch lighter than Frost ltd run. Below is a side by side picture of Ice Floe, Celeste and Frost.


All three of these super pale colours really come into their own when etched, which is something that Bullseye glass just does not do easily or well. They all look delicious etched but Limelight and Tutu need to be worked much cooler than I have done to get the best results. I want to try working with both again with the Nortel Minor on one oxy to see what difference the cooler set-up will make.

Jolene x

Messy Testing - Emperor ltd run

There are some new colours coming out from Creation is Messy in the Fall, I think Emperor ltd run is my favourite of the ones I have had the chance to play with so far.


As a self coloured bead it is a rich plummy purple transparent but when used as tiny dots it has quite a bit in common with Effetre Rubino Oro in the way it spreads and some reactions. In the image top left I have used stringers of Rubino and Emperor over hand pulled Effetre pale Opal Yellow to create raked fern decorations. Both glasses spread beautifully, the Rubino turned orange/yellow over the Opal Yellow and Emperor stayed deliciously pink.
 
These flowers are made with stringers of either Emperor (fist column) or Rubino (second column) placed directly over some common reactive bases. Both glasses spread out a lot, with the colour pooling at the centre of the dots giving a place cream/white outline.

The top row base is hand pulled Effetre Copper Green, middle row is Effetre light Turquoise, bottom row is Effetre New Violet.


Jolene x


11/06/2015

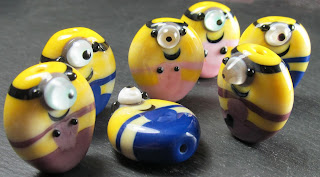
Minions in Dungarees, free tutorial challenge for Beads of Courage


Make a minion challenge for Beads of Courage
I was making some Minion beads for Beads of Courage the other day based on Heather Sellers fabulous make a Minion Challenge

I made one of them kinda oval just for fun and he looked like he was missing his dungarees so I decided to dress him and thought it would be nice to follow in Heather's footsteps and throw out a Minion making challenge for Beads of Courage too. 

So I challenge you all to make a minion and send it in :-D

UK Bead Donations:
Beads of Courage, Inc.
 c/o Diane Watt
 14, Radlow Crescent
 Marston Green
 Birmingham,  B37 7LZ

US Bead Donations:
3230 N. Dodge Blvd. Suite J
Attn:  Bead Donations
Tucson, AZ  85716

Canadian Bead Donations:
PO Box 71142
Silver Springs RPO
Calgary, Alberta  T3B 5K2

Firstly you will need to make some thick yellow stringer 2mm approx, some thick blue stringer 2mm approx and black stringer 1mm approx.

Wrap a wide footprint of blue glass on to your mandrel - I use the smallest cavity on CG Bead roller BR-46 large chunky oval to shape these oval minions. If you are hand shaping then aim to create a footprint that will be between 1/3 to half the length of your final bead.
Using a roller or by hand shaping with a graphite paddle, shape the wraps to form one half of an oval bead. If the flat end of your half oval has a pucker, gently heat and roll the bead against the side of your mandrel to remove the pucker to  minimise the chance of trapping a large air bubble in the middle of your bead when you add the yellow glass.
Add some wraps of yellow glass next to the blue taking care not to trap any air bubbles between the two colors.
Hand shape the yellow glass with your paddle to from the second half of your oval base bead or if using a roller, gently heat and press your bead into the roller cavity. Turn the mandrel a little between each press until you have created a balanced and smooth two-tone oval that will rotate freely in the roller cavity. If you have too much glass you can remove small quantities with a pair of long nose tweezers.
Wrap a line of thick yellow stringer around the blue half of your bead leaving a thin strip of blue at the centre which will create the straps of your Minion's dungarees. next wrap a thin line of black stringer around the yellow half of the bead near the bead hole.This will form the band for his goggles.
Melt your stringers in flat and then press your bead with some mashers, between two graphite paddles or with a parallel press. Don't worry about removing any chill marks at this stage as they will be removed during the next stages as you add further detail.
Take your blue stringer and create the "bib" part of your Minion's clothes by placing two swipes side-by-side that join up the dungaree braces to to the trousers. Repeat this for the back side also. Decide which face is going to be the front of your minion and place a small black dot where you would like the Minions mouth to be.
Melt all of the raised decoration in flush on both faces of the bead by warming the raised areas through and pressing them down gently with your graphite paddle. Once everything is flush partially mask your black dot with an offset dot of yellow to create the Minion's smile.
Melt the yellow dot in flat and then place a large grey dot from a full sized rod in the centre of the headband.
Flatten the grey dot but leaving it a little raised and then top the grey dot with white glass. Flatten the white dot also, leaving it slightly raised so that the dots are stacked up.
Top the white dot with a large blob of clear glass and let the clear glass round off to form a lens shape in the flame.
Choose your minions eye colour and place a small dot over the clear lens to create the iris. Next pick up your black stringer again and add a tiny dot to the eye to for the pupil. You can chose to add some more final last details at this point if you like, such as buttons and further details on the goggles. Warm your bead through and pop it in the kiln to anneal.

Minion beads are very well loved and treasured by Beads of Courage kiddos so it would be great if you wanted to give making them a whirl!

Have a lovely evening, Jo x
 
PS. This tutorial is written for bead makers with prior experience in mind. Please take all safety precautions when working with a very hot flame including proper eye protection and please do work in an adequately ventilated work space.


This tutorial is fan art and is not to be used for profit. It has no connection with the creators of Minions.


26/05/2015

www.kitzbitz.com my own website at last...


Last weekend I put on my big girl pants and set about building a website for my beads. I've spent the past week loading up the shop with pretty goodies, some of which you can see here :-D To celebrate I have a voucher code - 104U - for 10% off which is valid today and tomorrow (26th and 27th of May '15).

Come and have a look www.kitzbitz.com

Jolene xx


21/05/2015

Happy Hearts Tutorial in Beads & Beyond Magazine

I wrote a tutorial on how to make my Happy Hearts for the June issue of Beads & Beyond magazine but something went wrong in the proof reading stage and the mag went to print with the wrong step by step pictures next to the text.

Soooo now the full tutorial is up on their blog and I get to share the link with you :-D


Have a lovely evening, Jolene x
http://beadsandbeyondmagazine.blogspot.co.uk/2015/05/happy-hearts-june-issue.html

Rainbow woes part 2

 So the next step in my quest for perfect rainbows....Bullseye glass!

Bullseye is CoE 90 and much less finicky than CoE 104 in many ways, though I do often find the rods a tad shocky, especially French Vanilla.

The hearts on the left are over a base of Bullseye clear wrapped with stringers in various bright shades.

The orange looks a tad misty and the aqua and violet not as bright as I would have liked but overall I am pretty happy :D

I was super thrilled with these little rounds, all the bright stringers wrapped around a core of French Vanilla and encased in clear.

I am quite disappointed with Bullseye clear, there are quite a lot of micro bubbles in it, similar in many ways to Effetre 004. So the next thing is to try some other brands of CoE 90 clear...I have heard shat Schott clear is pretty good but hard to track down in the UK.

TTFN, Jolene x

23/04/2015

Rainbow woes........

 I loved making these and was tickled pink when they came out of the kiln looking like little sweeties yesterday morning. This morning I spotted and incompatibly crack in one of the hearts - literally heart breaking.

They were made over a core of CiM Peace with tiny wraps of bog standard Effetre colours over the top and encased with 006. The cracking is internal, partial and only over the "hot" colours.

So a few hours of pouring over internet and I found a good lot of interesting info on Lampwork Etc which talks about Cadmium based colours being inconsistent under encasement.
These rainbow rounds came out of the kiln looking perfect this morning. I made them before the first crack appeared on the hearts and just a few hours later 3 now show small fractures internally too.

So some things to try - making a core of clear glass under white before layering on the rainbow or making the rainbow directly over a core of clear. Or making a similar design using Bullseye glass which is CoE 90.....update coming soon.

Have a super evening, Jolene x