Etsy

30/05/2013

Green and white flowers, a study in colour and form

I've been out and about in the sunshine taking snaps of lush green plants. Here is a little collection of green and white images with lots of interesting texture.


Jolene xx


28/05/2013

52 little things week 22

Welcome to week 22 of 52 in my year long challenge. I am making and donating a special bead for each week of the year for the Beads of Courage program here in the UK. The program is sponsored by a small family run charity called Be Child Cancer Aware and is in place in 45 UK hospitals for children with cancer and blood disorders.

Act of Courage beads like this little purple robot and  are and gifted by glass artists all over the UK and Europe. They are given to children and teens on the program to mark milestones on a child's treatment journey. The strings of beads (in many cases hundreds of beads) that a child enrolled with BoC will collect through the course of their treatment are a powerful tool. They are a tangible way for friends, families and care givers to be able to see and recognise courage and bravery.


The Beads of Courage program helps to help to reduce illness related distress and encourages positive coping strategies. Every treatment bead gives a child something tangible to use to be able to discuss their treatment and experience. Beads of Courage are very powerful and I am very proud to be able to do something to help bu doing something I love, making glass beads. If you would like to know more about the program here in the UK please visit

Jolene x

24/05/2013

Mini Mo' May 2013 - Violet and Lilypad

My first Mini Mo' for May is simply called Violet. I've used Effetre Lavender 427, Effetre Light Violet 041, Dark Silver Plum in the form of shards and Goldstone chunks to make some handmade Goldstone stringers.
This first focal used some of the ribbon twistie from the violet collection over Effetre Light Violet 041 and under Effetre 006 clear. I've finished it with some sculptural floral decoration.
As I'd not made encased tree beads for a little while now I thought it would be great fun to have a try at making a new shape, an elegant rounded bicone. The result was this Magic Faraway Tree bead with boughs and branches laid down with Goldstone stringer.
The last Violet Mini Mo' beads I would like to show today are these sculptural floral rounds made with Effetre Alexandrite as a base and petals swiped on with some of the Violet twistie cane.
I chose subtle soft greens teamed up with touch of rich red brown for my second collection, Lilypad. This collection was made with CiM Commando, CiM Dirty Martini, Effetre Red Copper Green to make shards and rich Vetrofond Red Purple.

I've also written a little inspration filled tutorial for Mini Mo' Club using starburst murrini called One Murrini, Seven Ways.
The first bead I have to show you today is this beautiful big two tone bicone with Red copper green shards wrapped around it's middle and finished the design with raised ferns and petals.
This fab teardrop shaped bead has large leaves swiped on with Lilypad ribbon cane and vines made with the pretty two tone cane in this collection.
I've used the ribbon cane again to make this amber vines encrusted bicone focal. The base is Effetre medium Topaz wrapped with a long spiral of ribbon cane. I then encase the lot with Effetre 006 clear and decorative vines and leaves.

It is now possible to join the Mini Mo' Club via Etsy for 3, 6, 9 or 12 month long subscriptions. Please check out my shop link for more info.
Frit N Chips lampwork supplies.

Have a lovely week, Jolene x

22/05/2013

Plot 36 - slugs and snails

I have been rising edible plants from seed at home for the past couple of months in a walk in greenhouse that my partner gave me for my Mother's day present. Some of them have become juicy and delicious enough to be considered a fine buffet by something slimy in my garden. As you can see a little beastie went to town on this runner bean plant. It made me realise that though I have been digging, weeding and planting potatoes, I've been reluctant to take any of my precious wee plants down the lottie (daft...because that is what I'm raising them for!!) because I don't know how to keep them safe from pests. I read about copper tape that  slugs do not like to cross which inspired me to make little rings for the stems of my runners to keep the slugs at bay in the walk in greenhouse. They seem to have done the trick.

Luckily for me I have a secret weapon, his name is Roger and he is frankly brilliant. One of the lovely lass's on CP (Craft Pimp Forum) has put me in touch with her Dad who worked an Organic Kitchen garden for a living for 54 years before retiring not very long ago. I'm absolutely privileged to be able to pick his brain and our most recent chat has been all about slugs and snails. Roger told me that the simplest way to controls slugs is to use pellet's, there are ones readily available that are child and pet safe and environmentally safe. One of these is called Growing Success. 

Roger also recommended grit/sharp sand used around individual plants like squashes and courgettes as gastropods do not like to travel over it. Another great tip was to try is to lure them into the shade of slates, tiles or upside down pots so that they can be removed by hand even using half Grapefruit and Orange skins as bait.

 I will definitely be trying out all of these things and reporting back on progress!

Jolene x

21/05/2013

52 little things week 21

It's week 21! in my year long challenge to make and donate a special bead for each week of the year for the Beads of Courage program here in the UK. The program here is sponsored by a small family run charity called Be Child Cancer Aware and is in place in more than 40 UK hospitals for children with cancer and blood disorders.

Unique handcrafted glass beads like this little robot are called Act of Courage beads. They are given to mark milestones on a child's treatment journey and are much treasured. The strings of beads (in many cases hundreds of beads) that a child enrolled with BoC will collect through the course of their treatment are a powerful tool. They are a tangible way for friends, families and care givers to be able to see and recognise courage and bravery.


The Beads of Courage program helps to help to reduce illness related distress and encourages positive coping strategies. Every treatment bead gives a child something tangible to use to be able to discuss their treatment and experience. Beads of Courage are very powerful and I am very proud to be able to do something to help bu doing something I love, making glass beads. If you would like to know more about the program here in the UK please visit

http://www.bechildcanceraware.org/beads-of-courage

Jolene x


20/05/2013

Summer Beadathon in the press

Yay, brilliant news, 2013 Summer Beadathon is officially official and in the news! Beady news that is! We have been given a wonderful promo in the current issue of Beads & Beyond Magazine including a snap of Heather Kelly who made the very first bead at the very first Beadathon last year and our lovely Laney Mead too. What a fabulous way to launch the madness.....24 hours of solid lampwork bead making and fun, creating Act of Courage Beads and raising a bit of cash for the amazing Beads of Courage UK program. Can't wait! :-D


Who? A top notch crack team of volunteer glass artists working their tushies off
What? 24 hours of continuous bead making for Beads of Courage
Where? Kitzbitz HQ
When? Friday 26th and Saturday 27th of July
How can you get involved? Why not make a small donation to our fundraiser page or pledge to make some beads at home for BoC that weekend if you are a lampworker too.


If you would like to pledge Act of Courage beads please send them to 

Beads of Courage UK
Be Child Cancer Aware
  Close, Wickford
Essex SS12 9EH

Download a BoC Bead Donation Form Here

Thank you and have a lovely day, Jolene xx

Plot 36 - Reuse, recycle, making newspaper pots!

One of my lovely chums recently showed me a fab  blog post with reuse/recycle ideas for potting on your seedlings. I was rather taken with the idea of these sturdy newspaper pots so decided to give it a go. As you can see I've made a rather bumper crop, two newspapers worth. Follow the link above to see how they were done, the post is superbly easy to follow.

I'd already started to think about re-purposing deli and food trays with some holes punched in the bottom, this one contains cauliflower and cabbage seedlings which are ready for thinning out and potting on. One of the great thing about these paper pots is that you can plant the whole thing in the ground when your plants are big enough to go outside.
 

The clear container here is a supermarket grape punnet, these are the perfect size for 6 paper pots and they already have holes in the bottom for drainage.

I made so many paper pots today as I have started off some wild flower seed mix for kiddies corner on the lottie. I sprinkled masses of different kinds of flower seed in 3 large trays like the one in my second picture. With plenty of paper pots to hand it will be a cinch to prick them out and pot them on. We just need to eat more grapes now!

The paper pots are all round brilliant idea, loved making them and so practical!

Have a lovely day, Jolene

19/05/2013

Plot 36 - planting potatoes

This week has been a good and productive time down the lottie, I widened the raspberry bed and put in 5 new canes. The local council were digging up some flower beds in our local park and I managed to mump a few very pretty tulip bulbs and  spring annuals that were destined for composting for kiddie corner. On Saturday My lovely OH helped me put in 2 more short paths across the middle of the plot so that this coming week I can concentrate on digging over enough ground to get my brassicas in, only a dozen or so plants so doable I think....fingers crossed for the weather. 
Today's lottie post is all about potatoes though, top left is a picture of the first leaves from my early potato bed (Charlottes). It's the first time I've ever seen potato leaves, pretty exciting. On the right is a picture of one of the Sarpo Mira seed potatoes that I have had chitting on my kitchen side for the past few weeks.  I kind of wish I had got a close up shot if these sprouts before they went in to the ground as they put me in mind of Romanesque Broccoli (Roman Cauliflower).
I dug three trenches about 6 inches deep and placed generous handfuls of fresh cut Comfrey in the bottom. I then cowered the Comfrey cuttings with a little multipurpose compost and placed my seed potatoes on top about 9 or 10 inches apart. I then covered the potatoes with loose soil and raked the whole bed level. I'll earth up the plants periodically over the coming weeks to help keep any newly formed tubers covered from daylight.

Hopefully the quick rotting and nutrient rich Comfrey plants will give these seed potatoes a really great start.


Have a lovely week, Jolene xx


14/05/2013

52 little things week 20

It's week 20 in the Craft Pimp Forum year long challenge and this green eyed monster is the big sis of last weeks blooming amoeba for Beads of Courage UK. This pretty Blooming Amoeba bead has 3 kinds of flowers on the front and a yellow and black heart on the back.
I want to give a shout out to a very clever, driven and talented lady called Lynn Davy who has, inspired by this challenge, raised the stakes to a thing a day....after 20 weeks she has never missed a day! It brilliant :-D

Check out Lynn's Thing-A-Day post from March.

Have a great week, Jo x

13/05/2013

The quest for the Holy Grail.......

I've been working in a special glass colour chart resource for about 10 months or so now. It's a very kitsch and geeky Alphabetical Chart of (CiM) CoE 104 glass colours. 
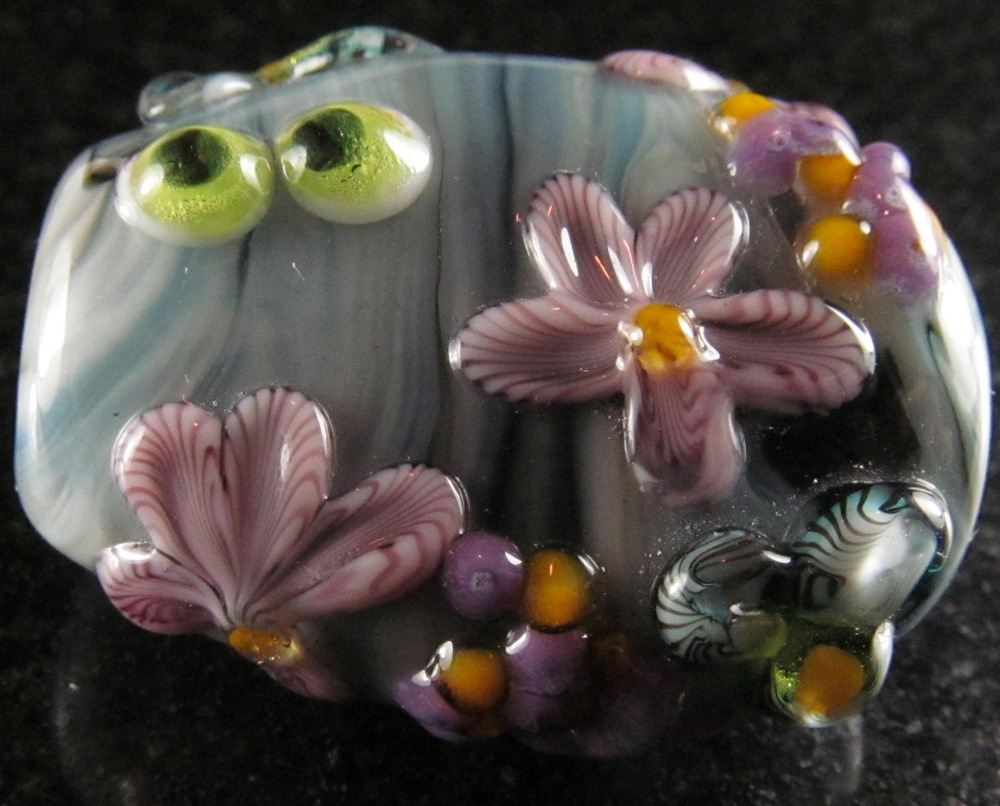
To the left here is just a small section of the chart as it stands today, this is just the S section.....all in all there are 163 beads.
Every bead has it's name doodled on it in glass too.

Algae Mushie
When I started this project I wasn't sure that the chart would ever become a complete representation of every glass that CiM have ever produced as some of the older colours are out of production.

I made the decision quite early on to exclude the colour variations labelled as "uniques" partly because they would all just get filed under "U" and partly because I have always liked the way that CiM have given their glass special names that conjure up a mental image of the shade, Freman, Clockwork, Crocus, Army Men.....utterly appealing :-D

Sunshine Mushie
Creation is Messy began production of CoE 104 glass for bead making back in 2006, a year or so before I even began lampworking.  Even so, because CiM take great care to maintain colour consistency within their regular line, I have been able to source some of the earliest colours from later melts.

Between my own stash, colours I'd been sent for testing and the lovely CiM shopping spree prize sponsored by Off Mandrel for coming second in Beads & Beyond Jewellery Maker of The Year competition (lampwork) last summer, I was well on the way to pulling the glass together for this project. Four colours remained completely elusive though, Algae, Sunshine, Tabby Grey and Dusk.

Tabby Grey


Just a couple of weeks ago I received the loveliest gift from JamieLynn who runs Howaco Glass in the U.S, and her friends. When my friend Sue showed JamieLynn the colour chart project on Craft Pimp she had a good look round her studio and also put out the word about the chart and that I was missing these colours. Amazingly she managed to find them all!
Dusk Mushie


When I wrote to thank JamieLynn she told me....The four colors actually came from four different people, each of them just had the one color and no one else had any of the colors, so I do believe it was ment to be.

I am so grateful  for the kindness of these five lovely ladies who have made the impossible possible.

With the addition of these four colours, at this very moment my CiM Colour chart is completely up to date.....though I did just spot the next collection of ltd run glass on the CiM Artists Preview Page. Am looking forward to having a play with those, Aloe Juice looks particularly appealing.

Jolene xx

12/05/2013

Messy Testing - Breeze, Mediterranean and Berry Mist

Today I am looking at a trio of gem toned ltd run colours from Creation is Messy which were released in March 2013. They are called Breeze, Mediterranean and Berry Mist .

I made this set of nugget beads with the intention of etching them to make frosted beads that have subtle muted colours inside. Once I got them out of the kiln though the colours were so bright and pretty that I couldn't bring myself to etch them after all. Each bead has  a small tube shaped core of saturated transparent colour which I then heavily encased in clear and shaped. From right to left the three beads in the front row are Mediterranean, Breeze and then Berry Mist.
This pretty set of nugget beads are made with one half of Reichenbach Antique Clear twined with one of my test colours and finished with a band of silvered ivory stringer (sis). As you can see there are no obvious reactions between any of the test colours and the silvered ivory stringer.
The top half of this sweet teardrop shaped bead is Mediterranean with Reichenbach Antique Clear at the bottom. The narrow section of Mediterranean at the top looks much lighter than the thicker middle section. There is also a much less dense looking band where the two colour meet because this area is a thin encasement of Mediterranean over Antique clear. This glass is quite saturated and very pretty.
Breeze is definitely my favourite of this ltd run trio, it is a deep, vibrant and happy true aqua colour. Here you can see Breeze encased with Effetre 006 clear. This colour is so gem-like and appealing that I'd love top see it become a permanent fixture in the CiM palette.
This last focal is made with a core Berry Mist which has been encased with Effetre 006 clear. Berry Mist is lovely, used on it's own it's neither too light and dilute too or saturated and dark...... Goldilocks would say "this purple is just right."

Jolene x

11/05/2013

Plot 36 - This week on the Lottie

It's been a funny old week on the Lottie, lots of organising, a bit of weeding, very little planting...

On Wednesday my lovely OH came down and helped me to create this long pathway along the full length of the back of the plot. It is edged with planks from an old decking pathway, plastic sheet and then covered with lots of wood chips. It means that the children now have the full run of the plot, front to back and side to side without the need to step over any junk. they can romp from the kiddies corner to the shed and back again, no problemo. Thursdays job was to begin digging the dreaded bindweed out to make a new bed for my runners, there are only 6 of 16 plants in the ground so far, rootling out all of the snaky roots is a time consuming job.

I have needed to find a place to put all of the bamboo canes and useful poles and pipes that used to be stored behind the shed (until I shifted them due to imminent perimeter fence work).

 I have also been putting off making a decision on where to site my compost heap because I imagine it is going to get pretty big. Solving the two problems in one, Friday's job was to turn a kind of low table-like platform on it's side and cable tie big metal grills to each end to contain clippings and kitchen waste. The sections at the back formed between the platform legs and the back of the shed are and ideal storage spot for canes.
Compost spot in place, on Saturday the kids and I spent some time raking all the leaves and twigs up from kiddies corner and creating this fab picnic spot. I put layers of plastic sheeting down then we hunter gathered some logs from around the communal wood chip pile and brought them to the plot. This area is much bigger than it looks in the picture, you can easily fit two grown-up size bottoms on each of the longer log seats and it will no doubt become the heart of kiddie corner.


Our other Saturday jobs were to re-purpose some old-CD's to make bird scaring mobiles, give the Charlotte bed a big dreching with the hose pipe, to de-bindweed a spot in the back trench for Ruby's Sweet Peas that she grew at home from seeds and to make a second rough and ready trellis for them to climb up.

I hope you are having a lovely weekend too

Jolene x

10/05/2013

Critter pics from Whipsnade Zoo

We took the tiddlers to Whipsnade Zoo for the first time today, had a ride on a little steam railway around the paddocks and watched the Sea Lions showing off in their daily show. It was a lovely day out, here are a few snaps of some of the critters we saw...


Have a great weekend, Jolene x