Etsy

29/10/2017

Messy testing - Apple Pie, Turtle Power and Juniper ltd run

This trio of lovely green shades of glass are all new limited run colours out this autumn from Creation is Messy. These dotty monster beads from left to right are made with Apple Pie ltd run, Turtle Power ltd run and Juniper ltd run decorated with Butternut ltd run spots. I made these guys to donate to Beads of Courage UK and Ireland.

Apple Pie ltd run is a pretty pale pastel green that does not show any striations on the finished beads. It is melts smoothly and is quite soft. It is very easy to work with and coped very well with the texture tool (Karen Leonardo featherbone mashers) that I used to created these leaf beads.
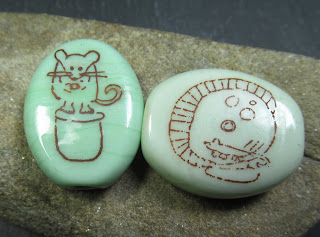


These sweet little tab beads here show a direct comparison between Apple Pie on the left and Primavera on the right. Apple Pie is darker and a touch more blue than Primavera. The drawings on these are doodles that my daughter has drawn and they are also destined to become Act of Courage beads for some brave kids on the Beads of Courage program in the UK.

Turtle Power ltd run is a bright mid toned green. It melts smoothly, is well behaved in the flame and coped well when chilled quickly by the texture tool I was using. I am not sure who made the tool that I used to texture these beads with but it looks like pair of concave clam shell plates on the end of long tweezers.

Juniper ltd run is a rich streaky dark green opaque shade. It puts me in mind of Sherwood ltd run. I used simple parallel mashers to create these beads. The mashers have created concentric chill marks on the surface of the leaves which I have not flame polished out as I think it adds an interesting and subtle texture to the finished design.

Jolene x


Messy testing - Rapunzel, Buttermilk and Enchanted ltd run

Rapunzel ltd run is one of the newest colours out from CiM this autumn. It is a very pretty opaque lilac which looks like a pinker version of Heffalump. These little bird beads show difference between the two, Hefalump bird on the left and a Rapunzel bird on the right. These beads have been photographed in natural daylight.
Next I have some Rapunzel flower bud beads with Enchanted petals to show. Both Rapunzel and Enchanted look different shades under different kinds of lighting, These  buds  show how they photograph under white LED lighting.

I sometimes have trouble with boiling the glass and creating micro-bubbles in pale transparent colours because I tend to work on the hot side (Carlisle mini CC torch on 2 oxygen concentrators). Enchanted was very well behaved for me and a real pleasure to work with.
This next pair of flower bud beads have a base of Buttermilk ltd run with Enchanted petals over the top. Buttermilk is a lovely creamy looking pale ivory colour which looks just lovely under the soft transparent lavender of Enchanted.

These beads have been photographed under white LED lights.
Buttermilk ltd run can be fumed with silver leaf, shown here with this tiny goddess bead. The darker areas are where the silver leaf has been burnished on to the bead and vapourised in the flame to leave small caramel tan areas of colour behind.

Jolene xx


20/09/2017

Messy testing - Chrysalis and Poolside ltd run

CiM Chrysalis ltd run was created in response to a request for an opaque version of Kryptonite. The hearts on the left are Chrysalis and the dotty beads on the right are made with Kryptonite. Chrysalis is a much paler pastel shade of green than Kryptonite, very pretty. It is denser than Kryptonite and does not appear to let any light pass through it at all but it also has special glossy look to it something akin to the gloss you see with some of the Effetre opalino colours. Chrysalis is a very pretty colour in it's own right and a welcome new addition to the 104 palette.

All of these flower bud beads have a base of Chrysalis with transparent teal petals swiped on over the top. The petals on the left most pair are made with Poolside ltd run and the petals on the right hand buds are made with Aegean ltd run. When placed as a very thin layer in this way these two pretty teal transparent glasses look very similar. In real life the Poolside beads are a touch lighter than Aegean.

These next  flower bead pairs were made with a base of CiM teal colours in various hues which have been partially encased with Effetre clear glass. On the left is Poolside, Aegean in the middle and Tuscan Teal ltd run on the right hand side. You can see very clearly here how different Poolside and Aegean look  when used to create the body of a bead. Below is a leaf created with layers of Poolside, Aegean and Tuscan Teal ltd run which gives it an effective looking ombre appearance.


Happy melting, Jolene xx


Messy Testing - Spooky ltd run

This collection of spooky ghost beads are made with various shades of Creation is Messy opal white glass. From left to right there is Cirrus, Spooky ltd run which is coming out very soon, followed by Frozen ltd run, Marshmallow ltd run, and last up Marble ltd run.

Spooky seems to sit about half way between Cirrus and Frozen in terms of translucency. It is really easy to work with. Like many of CiM's opal glasses it melts slowly and cools quickly making it super glass to use for sculptural beads.


Jolene  xx


11/09/2017

Messy testing - Tardis ltd run

This collection of flower bud beads have been made with some very pretty CiM opal blues including Tardis ltd run which will be available soon. On the left is Electric Avenue, the middle pair are Tardis and the last pair are made with Atlantis.
First up I want to talk about Tardis ltd run, which is a new shade to the 104 palette. It is a mid toned navy blue - the phrase stonewashed indigo denim springs to mind. The first pair of flower buds have a core of Tardis with Effetre clear petals swiped over the top. The second pair have a core of Effetre white with Tardis petals. Tardis looks bluer as the base of a bead and less saturated when used in a thin layer on top of the white core. It is a stiff glass, melts smoothly and is well behaved in the flame.
Electric Avenue and Atlantis are both part of the CiM regular line and have been available for a few years. Electric Avenue opal blue is a much bluer than Tardis, a bright royal blue even. It has s similar intensity of colour when used to create both the core and as thin petals on the top of the paler core colour. As with Tardis, and many other CiM Opal colours, Electric Avenue is a stiff glass. It melts slowly and cools quickly.
Last to show from me today is Atlantis, another pretty opal in the CiM blue palette, though this one is very much a bright turquoise shade. As with Electric avenue, the colour is not noticeably different when used a  thin partial encasement layer.

Jolene xx

27/08/2017

Messy testing - Canoe, Harvest and Monarch ltd run

There is a lovely trio of Autumnal shades on the way from CiM. From left to right these colours are called Canoe ltd run, Harvest ltd run and Monarch ltd run. My favourite of the three is Canoe, it has lots of character and strikes to a range of soft warm brown tones. When you melt Canoe it looks like a washed out and pale beige, the colours come in when you bring the bead back to the flame to strike it.

Canoe also strikes in the kiln, the spacers in this set were made 2 to a mandrel, the first spacer was struck as the second was made and the second went into the kiln un-struck. As you can see, all of the spacers have come out of the kiln a uniform shade. There is a reaction between Canoe and fine silver leaf, no colour change as such but a lovely metallic sheen is left when the leaf is vapourised in the flame.

These little flower bud beads have a core of Harvest ltd run with some Orange Crush ltd run petals swiped on top. The stamens were painted on with an encased stringer (Loch Ness ltd run over Daffodil ltd run).

Harvest is a very pretty mid orange opaque, slightly brighter than Creamsicle and quite similar in appearance to a long time sold out favourite of mine called Alley Cat ltd run.
The core of this next pair of metal beads is made with a pretty pale orange opaque glass called Monarch ltd run. Looking through my glass stash, the only glass I found that looked at all similar in rod form was Effetre yellow ochre -  but the beads that came out of the kiln were not even close!


The Monach beads have dots, the Effetre yellow ochre beads have black hearts. The yellow ocher came out of the kiln looking more like a caramel brown than the beautiful apricot orange of Monarch.

Jolene x


Messy testing - Jelly Bean and Siren ltd run

In this post I am looking at Jellybean ltd run and Siren ltd run. Jelly Bean is a pale apple green opal glass, shown here with turquoise dots. This picture shows how it compares with Chartreuse ltd run (lime dots) and Inchworm ltd run (black dots).  It's a very pretty colour, unique to  the 104 glass palette and fairly easy to work with. I find it is a fairly stiff glass and if worked too hot you can create micro-bubbles on the tip of the rod.
CiM have developed Siren ltd run as an attempt to replicate the now sold out Aloe Juice ltd run. The hearts on the left were made with Siren and the hearts on the right were made with Aloe Juice - these glass colours are dead ringers for one another but that is a little hard to see because of the vibrant turquoise and lime dots over the transparent base colours appear to trick the eye and give them each a differnet hue.

The focal hearts below are made with a thick core of either Siren (decorated with turquoise flowers) or Aloe Juice (decorated with purple flowers) encased in Effetre 006 clear glass. It is very easy to see from these beads what a close match these two colours are.


A quick edit to add this picture, I was asked if Siren etches and so I did a quick test by dipping this rod in tub of etchall fluid for a minute or two and neutralising it with baking soda in water. As you can see it etches beautifully.

Jolene xx

16/08/2017

Messy Testing - Bone ltd run

Creation is Messy will be bringing out some new glass colours in the autumn. This first trio of heart pairs in made with Bone ltd run. Bone is a lovely super pale ivory shade. It melts smoothly and quickly in the flame does not show any striations on the surface of your finished work. It reacts with fine silver but seemingly not with glass containing copper such as Effetre light turquoise.

Firstly I made a stringer by covering about 1 inch of the end of a Bone rod with silver leaf then melting in the silver and pulling the glass gather out to make a silvered stringer. The first pair of hearts are wrapped with the silvered Bone stringer. The wraps have come out looking nicely organic in a warm tan brown shade. You can also see that the silver has fumed a few small areas of glass adjacent to where it was applied (most obviously seen on the left hand side of the bottom heart just below the stringer line).

Interestingly, when using the silvered Bone stringer to make dots it seems that the organic effects are confined to the surface of the stringer while the centre of the dot remains the original pale creamy shade. This gives a very pleasing dot on dot effect. The last pair of beads were made with a base of Bone decorated with Effetre light turquoise dots. There is no reaction line apparent at all.

For comparison this next trio of beads are made in exactly the same way with Effetre light ivory glass. The first beads are made with silvered ivory stringer which is commonly used to give this earthy organic effect. In contrast with Bone there is no apparent additional colour from residual fuming from the silver in the applied stringer.

The second set of hearts has been decorated with dots made from silvered ivory stringers. The dots have a solid yet mottled appearance rather than the dot on dot effect as seen with the silvered Bone stringer dots. The third pair of beads quite clearly show a dark reaction line between the base of ivory and light turquoise dot decoration.

Jolene xx


27/03/2017

Building stamped scenes using cardboard masks - stamping tutorial

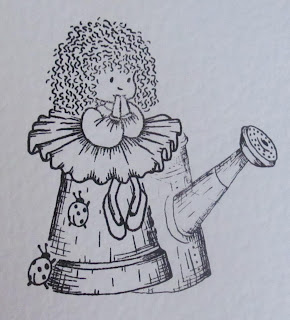
I've been playing about with more stamps sets from the Garden Secrets range from Hunkydory and building up complex scenes by masking off images and stamping partial images over the top.  This cute girl image comes from a set called Happiness Blooms. My first tutorial uses just this first stamp set. The second tutorial incorporates flowerpot images from the Cute as a Bug set which is also part of the Garden Secrets range.
Step one: Stamp the girl image on scrap card and carefully cut round her skirt and legs following the lines as closely as possible.
Step two: Stamp the girl image on to the card you are using for your design
Step three: Cover the stamped image with your cardboard mask.
Step four: Create a partial stamping of the watering can image for the girl to sit on.
When the mask is removed the image looks like this. Stamping over the mask creates the impression that the can is behind her.
Step five: Stamp the watering can image on scrap card and cut it out to make another mask.

Step six: Cover the watering can in your working image with the mask and stamp some partial flowers over the top.
Remove the mask and stamp in some more flowers in the foreground.
In this second tutorial I have created a more complex scene by masking multiple stamped images at the same time. I've picked out some adorable flowerpots that come from another Secret Gardens stamp set called Cute as a Bug.

Step one: Stamp then cover the girl image with the cardboard mask made earlier. Stamp the largest pot image for her to sit on.
Step two: Stamp the pot onto scrap card and cut it out carefully to create a mask for the pot and then cover the image on your work. Stamp a partial watering can  the right of the girl and pot.
When you remove the cardboard masks your image looks like this.
Step three: Cover the watering can and pot with their cardboard masks. Make a partial stamp using the small stack of pots stamp on either side of the covered image
When the masks are removed the image looks like this. I have filled up the foreground with some little leaf images to add more interest.

Step five: Mask the watering can image and stamp the bird image as though he is standing on top of the little stacks of pots
This is how the completed scene now looks with the watering can mask removed.

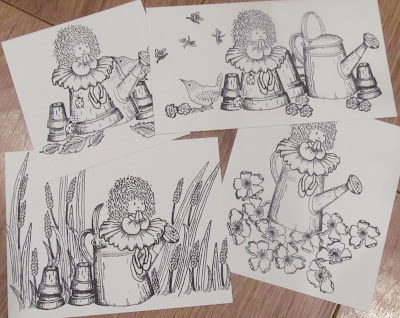
Below are another couple of examples of complex stamped and masked scenes using the same two stamp sets.

Happy Stamping, Jolene x


12/03/2017

You're so special greetings cards

Following on from my colouring tutorial yesterday I thought it would be fun to show some finished cards in a variety of colours made with the cute Garden Secrets You're so special stamp set from Hunkydory.
This first one is the one I coloured for the tutorial.


These cards are currently available in my Facebook group (March 17) www.facebook.com/groups/JoleneWolfe but some may make their way across to Etsy in a couple of weeks www.etsy.com/uk/shop/KitzbitzArtGlass

Jolene x